Clean and Lubricate Brake Parts
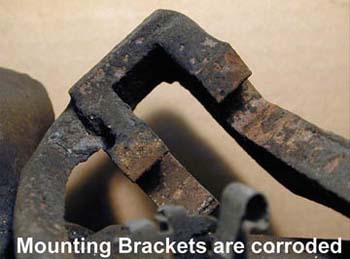
Because each vehicle is different, the amount and type of cleaning you will have to do can vary. Depending on the type of vehicle, and the are of the country you are in, you may have to take different steps to effectively clean the brake parts. Some vehicles have only a few key areas that need to be cleaned while others require considerable more effort. For example, if you work in the south or out west, then you are unlikely to run into too many rust problems. On the other hand, those in the snow belt are almost always going to find rusty car parts. For the purpose of this article, we will show you how to clean and lubricate a rusted part, like the one below:
Aggressive Cleaning
It is important to clean parts that look like this, if you don't you're likely to see problems down the road. When cleaning make sure to only remove the corrosion and not the good metal. In the image below, the bracket had a number of surfaces damaged by an aggressive cleaning with an angle grinder. This can cause the pads to fit too loosely or cause other related problems.
Cleaning Caliper "Ears"
One area that is commonly missed is the caliper "ears" that support the outer pad. These flat surfaces can have considerable rust buildup over time as shown below. Likewise, some brake quiet products can cause a similar buildup. If there are remnants of these products on the caliper's mating surface, it will reduce the surface contact and could increase the chances for brake noise. Failure to clean these surfaces will not allow the outboard pad to sit square against the caliper, thus increasing the chances for vibration.
Lubricating the Brake Parts
After all of the surfaces have been cleaned, they need to be lubricated. There are many choices out there for brake lube and even more opinions on which ones to use. We recommend the use of a high quality moly-lube on all metal to metal surfaces or high quality silicone lube for metal to rubber parts. Silicone is best for metal to rubber because silicone repels moisture and creates a nice barrier when used properly.When it comes to lubricants like these remember that "a little goes a long way". Too much can actually cause issues. For example, the bracket in the image below should have a light film of moly-lube applied as shown in figure 1. Next, install the anti-rattle hardware and apply a thin film to the surfaces that contact the brake pads as shown in the following image (figure 2). The bracket can now be installed on the vehicle.


Cleaning and Lubricating Brake Pads
Ok, so you've figured out the mounting bracket, but what about the brake pads? Again, most experts agree that a thin film of moly-lube is the best method to combat brake noise. They key here is to apply it where it will make the biggest difference. Rather than applying it to the entire back of each pad, apply a thin layer to each caliper "ear" and add a small circle on the inboard pad as shown in figure 3. The same should be done for pads with shims. On vehicles with multilayered shims, put a thin layer between each layer. In fact, this is how most vehicles come from the factory.
More Tips and Tricks
For more tips and tricks check out our other blogs, or consider joining our Facebook group "Mechanic Mafia". The group is a place for mechanics to rant, share experiences, post pics of jobs, and share repair tips and tricks. Click the button below to join now.More Articles
Facebook Group


